Woodfire Chicken Parmesan That Stays NOT SOGGY!
If you have ever struggled with soggy chicken parmesan, this Woodfire Chicken Parmesan approach flips the script in a way that feels simple but delivers a big payoff. Right from the start, the goal here is not just flavor, it is texture. Specifically, that balance between a crispy cutlet and a rich, flavorful topping that does not undo all the work that went into getting that crust right.
This Page Contains Affiliate Links. For more Info See My Disclosures here.
Woodfire Chicken Parmesan
Equipment
- Ninja Woodfire Grill
- Wide-bottom pan
- Ziploc Bag
- Mallet
- Mixing bowls
- Whisk
- ¼ Sheet Pan
- Zip Top Bag
Ingredients
- 4 Boneless Skinless Chicken Breasts
- Salt
- Black Pepper
- Dad Dust 50% Granulated Onion, 50% Granulated Garlic, Splash of MSG
- 1 tablespoon Olive Oil
- 4 Garlic Cloves
- 1 Can San Marzano Style Tomatoes
- 1 Tube Tomato Paste
- 3 tablespoon Butter
- 3 tablespoon Parmigiano Reggiano
- 3 Eggs
- 1 CUP Italian Style Breadcrumbs
- 1 Cup Whole Milk Mozzarella Shredded
- ¼ Cup Parsley
Instructions
- Prepare The Chicken: Butterfly or pound the chicken breasts, keeping them slightly thicker than traditional cutlets. Season with salt, Dad Dust, and black pepper.
- Make The Sauce: Heat olive oil over medium to medium low heat and add smashed garlic cloves. Saute until lightly browned. Add San Marzano style tomatoes, salt (start at 1 teaspoon and adjust to taste), Dad Dust, tomato paste, and optional pepper. Simmer for 10 to 15 minutes on low heat, stirring frequently. Add butter, then finish with grated Parmigiano Reggiano.
- Set Up Breading Station: Whisk eggs in one bowl. Combine Italian style breadcrumbs with cheese in another.
- Bread The Chicken: Dip chicken into egg, allow excess to drip off, then coat in breadcrumb mixture. Shake off excess.
- Cook The Chicken: Set Woodfire to Air Crisp at 400°F with Woodfire on. Spray basket with oil and place chicken inside. Cook for about 8 minutes, flipping halfway. Increase temperature to 450°F if needed for color.
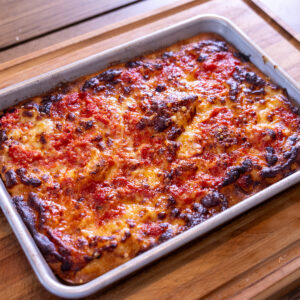
- Prepare Cheese And Sauce Layer: Place oil on a ¼ sheet pan, add a layer of sauce, then top with mozzarella. Broil in the Woodfire for about 4 minutes until melted.
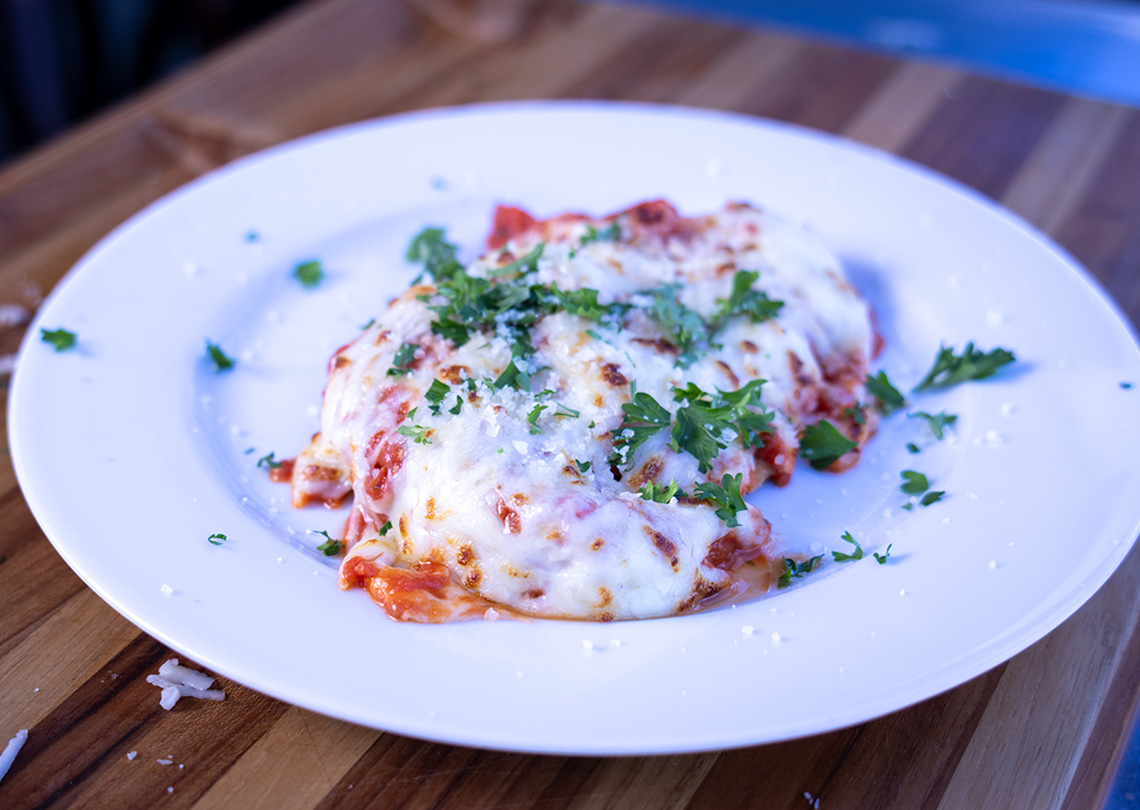
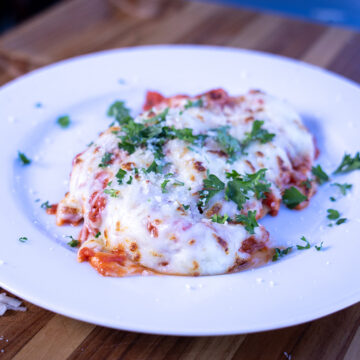
- Assemble And Serve: Make sure you have a high heat glove. Slide the melted cheese and sauce onto the cooked chicken. Garnish with parsley and serve.
Notes
To cook the cutlets the traditional way shallow fry in olive oil until golden brown. Finish them in a 350F(177C) oven until they hit 165F(74C). Drain on a paper towel.
Nutrition
 Tried this recipe?Mention @DadGotThis or tag #DadGotThis!
What makes this version stand out is how it leans into familiar techniques but adjusts them just enough to work with the Woodfire. Instead of going super thin like a traditional cutlet, the chicken is kept a little thicker. That small change matters because it allows the chicken to spend more time cooking and developing texture without drying out. As a result, you end up with a cutlet that is cooked through, holds up well, and still gets that crisp on the outside.
At the same time, the seasoning keeps things simple but effective. Salt, black pepper, and Dad Dust bring everything together. That mix of granulated onion, granulated garlic, and a splash of MSG is not traditional, but it adds a noticeable boost of flavor. It is one of those small tweaks that makes a difference without overcomplicating anything.
Why This Woodfire Chicken Parmesan Works
The biggest difference in this woodfire chicken Parmesan comes down to how the sauce and cheese are handled. Typically, chicken parmesan gets sauced, topped with cheese, and then sent back into the oven. However, that approach tends to undo the crispiness. All that moisture from the sauce and melting cheese softens the breading and turns what should be a crispy bite into something much softer.
Instead, this method separates those steps. The sauce itself is straightforward but packed with flavor. Olive oil, garlic, San Marzano style tomatoes, tomato paste, salt, Dad Dust, and a bit of pepper come together and simmer low and slow. Then, a couple of cubes of cold butter are added, which brings in a richness that balances the acidity of the tomatoes. Finally, grated Parmigiano Reggiano finishes it off and adds another layer of depth.
Because the sauce is built this way, it stands on its own. It is flavorful, balanced, and rich without needing anything extra. That becomes important later when it is paired with the chicken.
Meanwhile, the breading process stays classic. Eggs are whisked, breadcrumbs are prepped, and cheese is added to the breadcrumbs for extra flavor. The chicken is coated, excess egg is allowed to drip off, and everything is pressed into the breadcrumb mixture before being shaken off. That simple attention to detail keeps the coating from getting heavy or uneven.
Cooking in the Woodfire brings its own character. Using the air crisp setting at 400 degrees with Woodfire on gives the chicken time to cook through while developing that outer texture. Flipping halfway through keeps things even, and increasing the temperature later helps push for better color. Even though it may not match a traditional fry exactly, it still delivers a solid result with a decent crisp.
NOT SOGGY Means Smarter Assembly
This is where the entire concept comes together. The reason this method works is because the final assembly avoids the usual mistake. Instead of putting sauce and cheese directly on top of the chicken and sending it back to cook, the process is flipped.
A surface is prepared with a bit of oil, followed by a healthy amount of sauce. Then the mozzarella is added and melted under broil in the Woodfire. Once everything is melted and ready, it is slid directly onto the chicken.
That one move changes everything.
Because the chicken is not sitting under sauce and cheese while cooking, the breading holds its texture. At the same time, you still get that classic combination of sauce and melted cheese. It is a simple adjustment, but it solves the soggy problem in a way that feels almost obvious once you see it happen.
On top of that, it creates a great presentation moment. Sliding the melted cheese and sauce onto the chicken is not just practical, it looks impressive. If you are serving this at a gathering, that moment alone is going to stand out.
Flavor and Texture Come Together
Once everything is plated, the payoff is clear. The sauce brings a balance of sweet and acidic notes, along with a creamy richness from the butter and cheese. The chicken is cooked through and has a decent crisp on the outside. Even compared to a traditionally fried version, this still holds its own and delivers a satisfying result.
At the same time, the method proves that you do not need to sacrifice texture to get flavor. By changing how the components come together, you get the best of both. The chicken stays crisp, the sauce stays rich, and the cheese melts perfectly without softening the breading.
That is what makes this version stand out. It is not about reinventing chicken parmesan, it is about solving one of its biggest problems with a simple shift in technique.
Ingredient and Equipment Links:
Use Dad's Affiliate Link & get your own Ninja Woodfire Pro Connect Outdoor Grill:
https://ninjakitchen.pxf.io/k0JNLN
Ninja Woodfire Grill Griddle:
https://amzn.to/3S2Dpnd
Smokin Pecans Pellets:
https://amzn.to/3LiZx9i
Raised Grates for Ninja Woodfire:
https://amzn.to/3LjweU2
Did you know Dad is on YouTube?
Go check out Dad's youtube channel for all kinds of great cooking videos and food-related content.


Leave a Reply