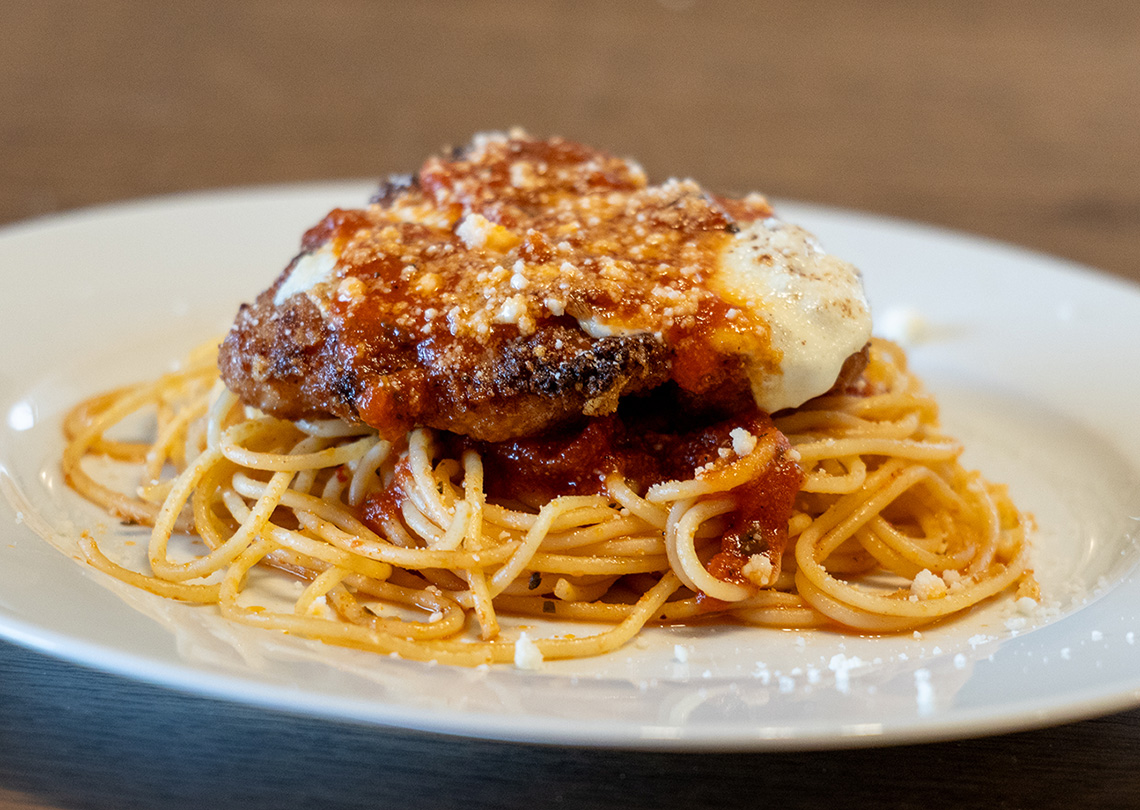
Cast Iron Chicken Parmesan: Crispy, Cheesy, and Kid-Approved!
There's something extra special about teaching your kid how to make one of their favorite meals from scratch-especially when that meal is Cast Iron Chicken Parmesan.
This Page Contains Affiliate Links. For more Info See My Disclosures here.
On a mission to pass down a family recipe that's stood the test of time, I grabbed my Victoria Cast Iron pans, rolled up my sleeves, and jumped into the kitchen with my daughter. What followed was part culinary lesson, part comedy show, and all heart.
From the very beginning, this Cast Iron Chicken Parmesan adventure was built on the basics: real ingredients, family traditions, and a whole lot of fun. The red sauce? Straight out of my mom and nana's recipe book, simmered in the Dutch oven like they used to do. The chicken? Brined for juiciness, flattened for even cooking, and breaded with care (and a few giggles). It's comfort food done right-with crisp edges, a bubbly cheese topping, and plenty of flavor packed into every bite.

Cast Iron Chicken Parmesan
Equipment
- Cast Iron Dutch oven or heavy-bottom pan
- Medium and large bowls
- Whisk
- Sheet pan + wire rack
- Large cast iron skillet for frying
- Tongs
- Zipper storage bag
- Broiler-safe oven
Ingredients
Chicken Parm
- 1 lb Spaghetti Cook to Package Directions
- 3 chicken breasts split and pounded thin
- ¼ cup flour
- 3 eggs
- 3 tablespoon milk
- ½ cup Pecorino Romano cheese
- ½ cup Italian breadcrumbs
- Fresh mozzarella sliced
- Spaghetti cooked al dente per package directions
- Olive oil for frying
Chicken Brine
- ½ cup sea salt
- ½ cup white sugar
- 4 cups water
Mom’s Red Sauce
- 1 can tomato paste
- 1 can whole tomatoes
- 14 oz Water
- 4 garlic cloves minced
- 1 teaspoon granulated garlic
- 1 teaspoon granulated onion
- 1 teaspoon oregano
- 3 tablespoon olive oil
- Salt & pepper to taste
Instructions
Make Mom’s Red Sauce
- In a Dutch oven, heat 3 tablespoon olive oil over medium heat.
- Add onion, garlic, granulated garlic, and granulated onion.
- Cook until the onions turn translucent.
- Stir in tomato paste and cook until it darkens significantly.
- Crush whole tomatoes by hand and add them to the pot. Mix well.
- Add oregano, salt, and pepper to taste.
- Reduce heat to low and simmer for 1 hour, stirring every 10 minutes to prevent burning.
- After 1 hour adjust seasoning if needed.
Brine the Chicken
- While the sauce is 30 minutes into simmering, mix brine ingredients together.
- Place chicken in a zipper bag with the brine and refrigerate for 30 minutes.
- After brining, remove the chicken and dry it extremely well with paper towels.
Bread the Chicken
- Set up a breading station with:
- A dish of flour
- A bowl with beaten eggs and milk
- A dish with mixed Pecorino Romano and breadcrumbs
- Dredge each chicken piece:
- First in flour
- Then in the egg mixture
- Finally in the cheese/breadcrumb mixture
- Place breaded cutlets on a wire rack.
Fry the Cutlets
- In a wide heavy-bottom skillet, add enough oil to coat the bottom and heat over medium-high.
- Once hot, fry chicken cutlets in batches for 1–2 minutes per side, until golden brown.
- Transfer to a wire rack set over a sheet pan to keep crispy.
Add Cheese & Broil
- Preheat your oven to broil.
- Top each cutlet with sliced fresh mozzarella.
- Place under the broiler until the cheese is melted, bubbly, and browned.
Plate & Serve
- Plate your spaghetti.
- Top with sauce, then a crispy cheesy cutlet, then more sauce.
- Sprinkle with extra grated cheese.
- Serve immediately—or risk soggy sadness!
Nutrition
 Tried this recipe?Mention @DadGotThis or tag #DadGotThis!
Why Cast Iron Chicken Parmesan Hits Different
Let's start with the red sauce. It's not just a side note-it's a co-star. Made with minced garlic, granulated garlic and onion, and tomato paste, this sauce develops its deep flavor by caramelizing the paste until it's just shy of burnt. That technique, passed down through generations, brings a richness you just can't get from anything store-bought. Once the San Marzano-style tomatoes hit the pan, the transformation begins. Salt, pepper, and oregano go in (yes, oregano-don't argue with grandma), and it simmers down into something special.
And yes, we made that sauce in a Victoria Cast Iron Dutch oven. This pan is a beast-in a good way. It handles the slow simmer like a champ, keeps heat even, and just feels right for this kind of old-school cooking. Cast iron doesn't just cook-it elevates.
Perfect Cutlets Start with Brine and a Mallet
Most people skip the brining step when it comes to chicken parm, but not here. We mixed four cups of water with half a cup each of salt and sugar to create a quick brine. Just 30 minutes in that solution makes the chicken noticeably more flavorful and juicy-and not overly salty, because we didn't overdo the soak. This little trick is one of the unsung heroes of our Cast Iron Chicken Parmesan process.
After the brine, we busted out the mallet and got those chicken breasts nice and flat. Not only does that help with even cooking, but it also leads to crispier, thinner cutlets-exactly what you want when frying. The kiddo got in on the action here, mastering the "bag and bash" technique with serious enthusiasm. And that's what made this experience even better. The recipe wasn't just delicious-it was memorable.
Fry It Up in the Victoria Cast Iron Skillet
Now, let's talk about the frying. We used olive oil-not a typical choice for deep frying, but it worked perfectly for our shallow fry technique. The goal was golden, crispy cutlets without taking the oil too high in temperature, and our Victoria Cast Iron skillet handled it beautifully. The cutlets cooked evenly, and thanks to their thinness, they didn't need long in the pan. Plus, the special handle design meant I could actually hold the pan handle during cooking without burning my hand. That's not just convenient-it's game-changing.
Another bonus? That signature Victoria surface gives just the right amount of crust. It's the kind of crispy you dream about when you think of Cast Iron Chicken Parmesan-not greasy, not soggy, just golden brown perfection.
Cheese on Top, Sauce on the Side
Most chicken parm recipes go for that full layering of sauce, then cheese, then more sauce. Not this one. I purposely kept the sauce off the top to preserve the crispiness of those beautifully fried cutlets. We simply added fresh mozzarella slices and slid the pan under the broiler until the cheese was melted and bubbling with little golden-brown spots.
The result? A final dish that didn't compromise on texture. The cutlet stayed crispy, the cheese melted into gooey glory, and the red sauce was served up on the side where it could shine without turning everything soggy. That's what makes this version of Cast Iron Chicken Parmesan so special-every element gets to do its job without overshadowing the others.
A Family Favorite Made Better with Cast Iron
Cooking this recipe with my daughter wasn't just about dinner-it was about connection. From learning to slice chicken safely to dipping fingers (and sometimes whole hands) into flour, eggs, and breadcrumbs, it was a full-on kitchen bonding session. And honestly? The meal turned out better than most restaurant versions we've had. The flavors were deep, the textures were perfect, and the joy of making it together brought everything to the next level.
Using Victoria Cast Iron made a big difference at every stage. From building flavor in the sauce to frying up cutlets and finishing everything under the broiler, these pans just worked-no fuss, no hotspots, no drama. If you're tackling something as classic as Cast Iron Chicken Parmesan, you want tools that feel timeless too.
Ingredient and Equipment Links:
Grab Some Victoria Signature Series Cast Iron Pans:
https://victoriasignature.com
Did you know Dad is on YouTube?
Go check out Dad's youtube channel for all kinds of great cooking videos and food-related content.


Leave a Reply