
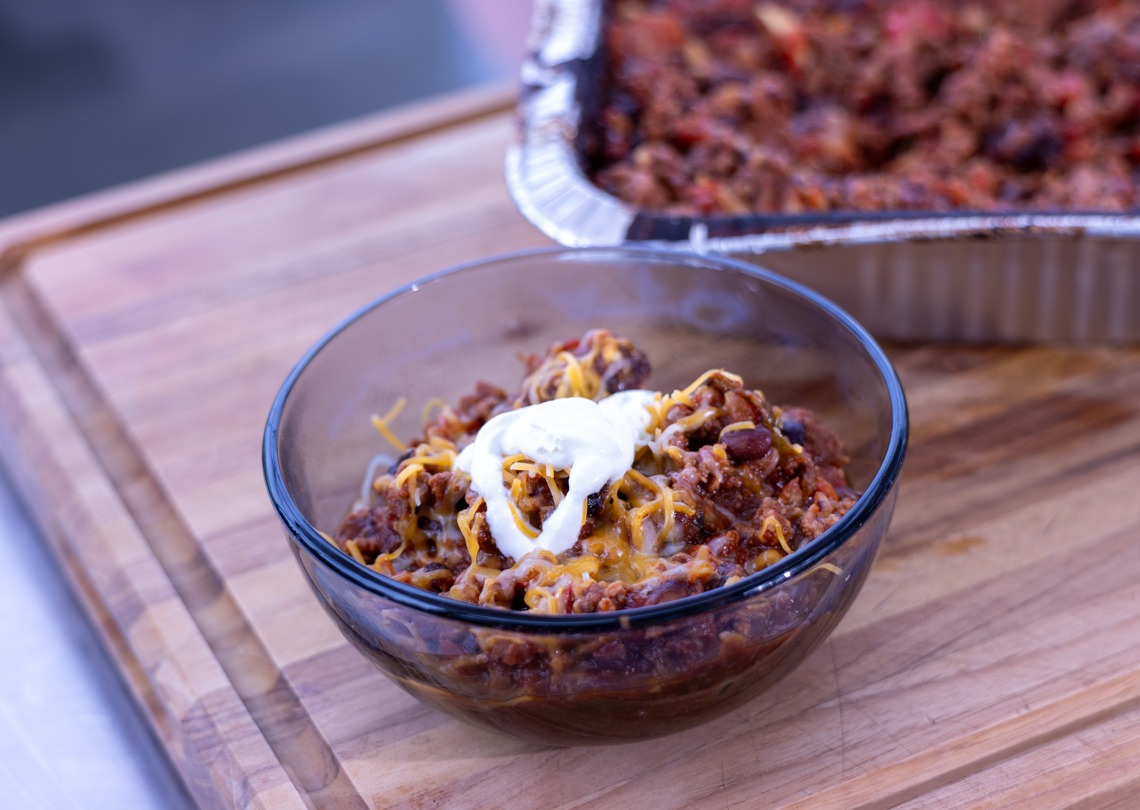
Ninja Woodfire Over the Top Chili has a pretty convincing argument going for it: the beef gets to smoke above the chili, the drippings land right where you want them, and dinner comes together in a foil pan. Today, Dad is giving that idea a roasted pepper twist, with a little birria inspiration and a lot less heat than you might expect.
What do you get when you mix a jalapeno, an excavator, and a chihuahua? Hot diggity dog. With the important business out of the way, we can talk chili. This cook is about smoky beef, sweet roasted peppers, and finding out whether a simple setup can make Dad reconsider every other way he has made chili.
This Page Contains Affiliate Links. For more Info See My Disclosures here.
Jump to:
Ninja Woodfire Over the Top Chili
Equipment
- Ninja Woodfire
- Catering steam pan
- Rack
- Temperature Probe
- Knife
- Heat proof glove
- Gloves
- Spoon
Ingredients
Roasted peppers
- 2 Cubanelle peppers
- 1 Poblano pepper Seeds removed after tasting
- 1 Red bell pepper
Chili base
- 28 OZ Can Crushed tomatoes
- .7 OZ Can Chipotle pepper in adobo
- ½ Large onion Diced
- 5 Cloves Garlic Roughly chopped
- 15 OZ Can Black beans Drained, not rinsed
- 12 OZ Beef Stock
- 1 teaspoon Granulated Garlic
- 1 teaspoon Granulated Onion
- 2 teaspoon Cumin
- 1 teaspoon Coriander
- 1 teaspoon Smoked Paprika
- ⅛ teaspoon Cinnamon
- 4 Bay leaves
- 2 teaspoon Salt Starting amount
- ½ teaspoon Black pepper
Beef
- 2 LB Ground chuck 80/20
- 1 tablespoon Salt Estimated
- 1 tablespoon Black pepper Estimated
- 1 tablespoon Granulated onion Estimated
- 1 tablespoon Granulated garlic Estimated
- 1 tablespoon Cumin Estimated
- 1 tablespoon Smoked paprika Estimated
Final adjustments and toppings
- 1 teaspoon Salt Added after tasting
- 3 tablespoon Apple cider vinegar Adjust to Taste
- 4 tablespoon Shredded cheddar cheese For serving
- 1 tablespoon Sour cream For serving
Instructions
Roast and prepare
- Set the Ninja Woodfire to broil and preheat for about five minutes. Add the peppers and check after about five minutes. Continue until blistered and charred. In the video they need about 20 to 25 minutes, followed by a few more minutes.2 Cubanelle peppers, 1 Poblano pepper, 1 Red bell pepper
- Dice half of the large onion and roughly chop four or five large garlic cloves. Let the roasted peppers cool, then peel the skins as well as possible. The cubanelle skins do not peel as cleanly as the poblano. Taste for heat and remove the poblano seeds as Dad does.2 Cubanelle peppers, 1 Poblano pepper, 1 Red bell pepper, ½ Large onion, 5 Cloves Garlic
Build the chili and prepare the beef
- Combine crushed tomatoes, onion, garlic, drained black beans, and 12 OZ beef stock in a small catering steam pan. Stir in the chili base seasonings. If you want spicy chili add the whole can of chipotle in adobo, if you want a mild chili hold back the chipotle in adobo until tasting later.28 OZ Can Crushed tomatoes, ½ Large onion, 5 Cloves Garlic, 15 OZ Can Black beans, 12 OZ Beef Stock, 1 TSP Granulated Garlic, 1 TSP Granulated Onion, 2 TSP Cumin, 1 TSP Coriander, 1 TSP Smoked Paprika, ⅛ TSP Cinnamon, 4 Bay leaves, 2 TSP Salt, ½ TSP Black pepper
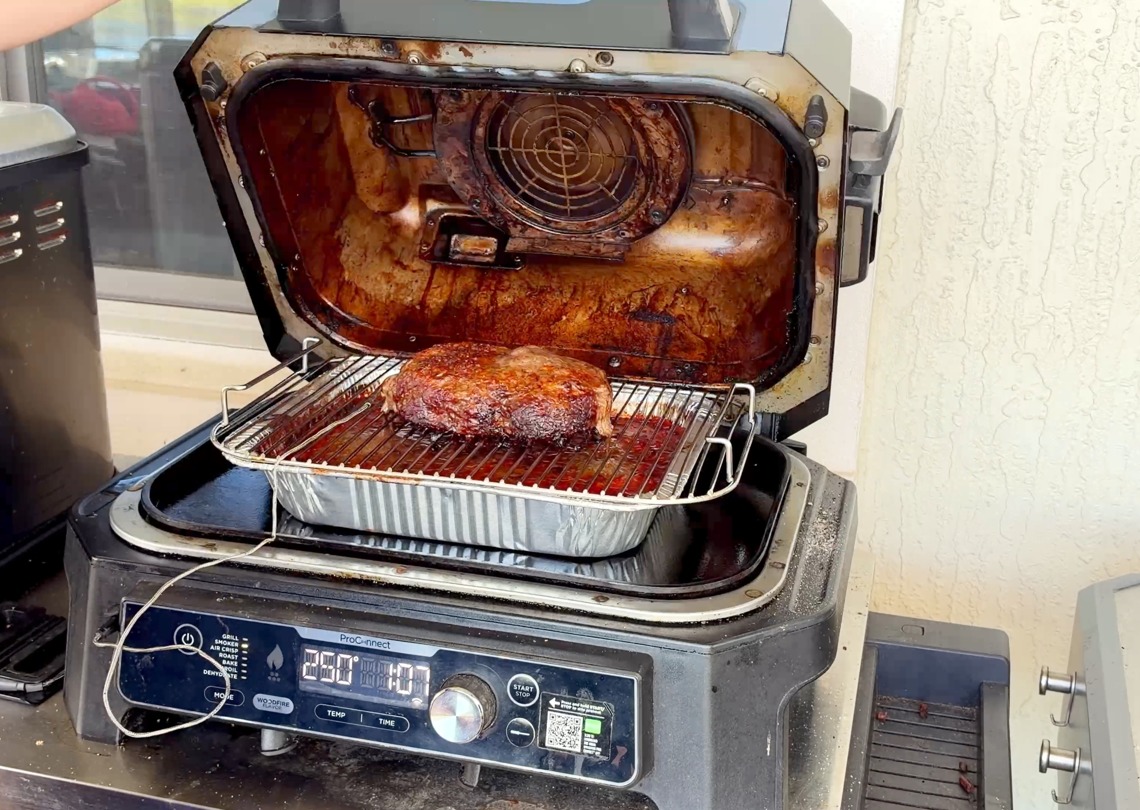
- Fill the pellet hopper with your chosen pellets. Dad uses pecan pellets and a heat proof glove to handle the hot hopper, don't forget to do the Dad Shake. Select smoker mode at 250°F (121°C). The seven hour timer setting is not the expected cooking duration.
- Shape the 2 LB of ground chuck so it holds together with reasonably even thickness. Season with 1 tablespoon each of salt, black pepper, granulated onion, granulated garlic, cumin, and smoked paprika. These beef seasoning amounts are estimated. Add the prepared peppers to the chili base.2 LB Ground chuck, 1 TBSP Salt, 1 TBSP Black pepper, 1 TBSP Granulated onion, 1 TBSP Granulated garlic, 1 TBSP Cumin, 1 TBSP Smoked paprika, 2 Cubanelle peppers, 1 Poblano pepper, 1 Red bell pepper
Smoke and finish
- Place the beef on a rack above the pan of chili so the drippings fall into the base. Insert a probe. Smoke until the beef reaches 160°F (71°C) internally, about two to three hours in this cook. Follow the probe temperature rather than the time.2 LB Ground chuck
- Crumble the cooked beef into the chili and mix. Taste, then add a couple of hefty pinches of salt (to taste), apple cider vinegar (to taste). If you held back the chipotle peppers add as much as you like with some adobo sauce.1 TSP Salt, 3 TBSP Apple cider vinegar, .7 OZ Can Chipotle pepper in adobo
- Return the chili to the Woodfire at 275°F (135°C) for about 30 minutes to one hour. In the video, Dad finishes after one hour. Serve with 4 tablespoon shredded cheddar cheese and 1 tablespoon sour cream.4 TBSP Shredded cheddar cheese, 1 TBSP Sour cream
Video
Notes
Nutrition
 Tried this recipe?Mention @DadGotThis or tag #DadGotThis!
Why Ninja Woodfire Over the Top Chili Makes Sense
The name is wonderfully literal. Instead of browning the ground beef separately, Dad puts it on a rack above the other chili ingredients. That gives the meat a chance to smoke while the drippings fall into the pan below. Somebody else invented the method, and Dad is happy to give them credit. He is also happy to borrow a good idea when dinner is involved.
There is something satisfying about seeing the whole setup working together. The meat has its own space, the chili base has its own pan, and neither part feels like an extra project. Meanwhile, the disposable pan makes the cleanup argument almost as appealing as the food. Dad likes easy cooking, and this recipe makes that preference pretty clear.
Roasted Peppers Without Turning Dinner Into a Heat Contest
Dad calls this a birria inspired chili, then immediately points out that it is not birria. The peppers are different because his family does not like hot food. That distinction matters. The goal here is a good peppery flavor without making everybody at the table reach for a rescue drink.
Two cubanelle peppers, a poblano, and a red bell pepper give this cook its direction. They go into the Woodfire to blister and char before joining the chili. However, the pepper prep does not behave quite as neatly as Dad hopes. The poblano skin pulls away nicely, while the cubanelles are less cooperative. Sometimes dinner comes with a small lesson in pepper behavior.
Rather than pretending the whole process was perfect, Dad works with what he has. He tastes the peppers, considers the heat, and holds back the chipotle in adobo until he can judge the chili itself. That is part of the appeal of watching this cook. You get the decisions along with the ingredients.
A Chili Base With Some Personality
The pan starts with crushed tomatoes, onion, garlic, beans, and beef stock. And yes, there are beans. Dad likes them in chili. If you do not, his position is refreshingly simple: do not put them in yours. This is dinner, and the bean debate does not need to hold it hostage.
Instead of reaching straight for chili powder, Dad uses a combination of seasonings. Cumin, coriander, smoked paprika, granulated garlic, and granulated onion bring their own character. There is also a tiny pinch of cinnamon and a couple of bay leaves. The cinnamon is deliberately restrained. It is one small part of the blend, rather than an announcement that dessert has somehow wandered into the smoker.
Later, Dad tastes the chili again and makes adjustments. More salt, a splash of apple cider vinegar, and a chipotle pepper with some adobo sauce enter the picture. Those changes are part of the actual cook, so the recipe card below keeps them where they belong.
Ninja Woodfire Over the Top Chili and the Beef Above It
For the meat, Dad uses two pounds of ground chuck with an 80/20 blend. He shapes it so it will hold together and have a reasonably even thickness. The seasoning stays familiar, with salt, black pepper, granulated onion, granulated garlic, cumin, and smoked paprika.
The Woodfire is set to smoke at 250°F (121°C), and a probe keeps track of the beef. Dad emphasizes temperature over the clock. In this cook, the meat takes about two to three hours to reach 160°F (71°C), but he explains that the starting temperature of the beef, its consistency, the weather, and the cooker can all affect that timing.
Once the beef is ready, it joins the chili instead of staying on its perch. Then the pan goes back into the Woodfire at 275°F (135°C) for the final cook. Dad describes that part as letting the flavors get to know each other. Apparently even chili needs a little time to socialize.
The Taste Test That Settled It for Dad
With cheddar and sour cream on top, Dad finally gets to the important part. His verdict is a mild chili with smoky, sweet, peppery flavor. The roasted peppers come through, and the smoke feels balanced rather than overwhelming. That is exactly the direction he was aiming for when he chose the peppers at the beginning.
Then comes the bigger reaction: he is never making chili another way. The flavor wins him over, but so does the lack of cleanup. There is no separate pan of browned beef waiting for attention, and the foil pan can be thrown out when he is done.
If you want more heat, Dad suggests swapping in hotter peppers. However, this version shows why mild food can still have plenty going on. Between the roasted peppers, the smoked beef, and the seasoning adjustments, there is more to the story than simply making chili spicy. The video shows the real cook, complete with pepper peeling frustrations, the highly scientific Dad Shake for the pellets, and the taste test that brings it all together.
Ingredient and Equipment Links:
Use Dad's Affiliate Link & get your own Ninja Woodfire Pro Connect Outdoor Grill: https://ninjakitchen.pxf.io/k0JNLN
Did you know Dad is on YouTube?
Go check out Dad's YouTube channel for all kinds of great cooking videos and food related content.
Leave a Reply